For:
- Key Stage 2 in England and Wales
- Second Level, P5-P7 in Scotland
- Key Stage 1/Key Stage 2 in Northern Ireland
You can also download the lesson plans as a PDF with accompanying powerpoint slides.
Written by Rachel Leach
Background
The composer: Delia DERBYSHIRE (1937–2001)
- British composer of electronic music
- Member of the legendary ±´”„tv Radiophonic Workshop ‚Äì a group of pioneering musicians and engineers responsible for producing sound effects and incidental sounds for TV and radio
Explore and download lesson plans for six weeks of learning and activities for Doctor Who Theme by Delia Derbyshire.

The music: Doctor Who Theme
- The famous melody was actually written by Australian composer Roy Grainer. Delia’s task was to ‘realise’ or ‘arrange’ the theme using electronic sounds to match the futuristic sci-fi nature of the programme
- Derbyshire’s version uses ‘found sounds’ that were manipulated electronically. She recorded the sound of everyday objects onto tape and then changed the speed of the tape to create different pitches or looped single sounds over and over to create rhythms. This was back in 1963 before computers made such experiments easy!
- Scandalously, Derbyshire was not credited with the composition of the now iconic original version and received very little money for it
Trailblazer: Composer Delia Derbyshire created a new sound-world using electronic sounds, using these to arrange the melody for Doctor Who – one of the most famous TV shows ever!
Explore and download powerpoint slides for six weeks of learning and activities for the Doctor Who Theme by Delia Derbyshire.

Learning outcomes
Learners will:
- listen and reflect on a piece of orchestral music
- create their own piece of music using instruments, voice and technology
- perform as an ensemble
- learn musical language appropriate to the task
Curriculum checklist:
- play and perform in ensemble contexts, using voices and playing musical instruments
- improvise and compose music for a range of purposes using the interrelated dimensions of music
- listen with attention to detail and recall sounds with increasing aural memory
Glossary of music terms used:
- Found sound - sounds found in the ‘natural’ world or made from non-musical objects and then used to make music
- Graphic score - a visual (often diagrammatic) representation of music. There are no rules for graphic scores, the composer (i.e. you!) invents them
- Melody - another word for ‘tune’. A musical sentence
- Orchestrate - choose which instruments perform which parts of the music
- Ostinato - a repeating (often rhythmic) pattern
Glossary terms can be found in bold throughout.
Resources required:
- classroom percussion instruments
- art materials
- music editing software – the lesson plans below use Audacity. This is free to download and compatible with most desktop computers. Feel free to adapt to use with whatever software you are familiar with
This scheme of work is plotted out over six lessons. Feel free to adapt it to suit your children and the resources you have available.
The six lessons at a glance
Lesson 1:
Activities:
- Watch the film
- Listen to the performance
- Make a graphic score
Curriculum link:
- Listen with attention to detail and recall sounds with increasing aural memory
- Use and understand staff and other musical notations
- Appreciate and understand a wide range of high-quality live and recorded music drawn from different traditions and from great composers and musicians
- Develop an understanding of the history of music
Lesson 2:
Activities:
- Play the Doctor Who theme on ‘found sounds’
Curriculum link:
- Listen with attention to detail and recall sounds with increasing aural memory
- Improvise and compose music for a range of purposes using the interrelated dimensions of music
Lesson 3:
Activities:
- Record sounds from around the school
Curriculum link:
- Listen with attention to detail and recall sounds with increasing aural memory
Lesson 4:
Activities:
- Manipulate sound files using music editing software
Curriculum link:
- Listen with attention to detail and recall sounds with increasing aural memory
- Improvise and compose music for a range of purposes using the interrelated dimensions of music
Lesson 5:
Activities:
- Create rhythms and melodies from ‘found sounds’ using music editing software
- Use musical terminology appropriate to the task
Curriculum link:
- Listen with attention to detail and recall sounds with increasing aural memory
- Improvise and compose music for a range of purposes using the interrelated dimensions of music
Lesson 6:
Activities:
- Structure sections of music into a bigger piece
Curriculum link:
- Improvise and compose music for a range of purposes using the interrelated dimensions of music

LESSON 1 - Watching and listening
- Prepare your class
Explain to your class that you are going to begin a six-week music project focusing on a fantastic piece of music by a composer called Delia Derbyshire, and listen to the Doctor Who Theme.
Ask them if they recognise it!
Listen to the opening credits of the Doctor Who Theme arranged by Delia Derbyshire.
- Watch the ±´”„tv Ten Pieces Trailblazers film and have a discussion about Delia Derbyshire. Ask your class to think about:
- Why there were so few women composers in the past
- What working at the ±´”„tv Radiophonic Workshop and inventing sound effects might have been like
- How Delia must have felt after receiving no public recognition for her work
- Listening task
Listen or watch the full orchestra performance again and point out that it is constructed from two musical ideas, can your children identify them?
There is a pounding bass line and a swooping melody.
Give out art materials and ask your children to choose two colours, one to represent the bass line and one for the melody. A3 paper will work best for this task, placed landscape on their desks. As you listen again, challenge the class to draw the bass line running across the bottom of the page. They must make shapes that represent the shape of the music. Make sure they focus just on the bass line.
Listen again and this time, your children must draw the famous, swooping melody. This can cover the top half of the page, running from left to right.
Take a look at the resulting artwork and explain that these are ‘graphic scores’ – music doesn’t have to be written out using lines and dots, and the original version of this theme wasn’t written out like that for many, many years.
FINALLY, end your session by discussing the instruments used in the Doctor Who theme. Which instruments can they spot and which sounds are new to them? Perhaps these are made by something other than a traditional instrument? If you have time play them another version of the theme for a quick compare and contrast activity. The 2005 version by Murray Gold (available online) features more ‘traditional’ instruments whereas Delia’s original version from 1963 features none!
Segun Akinola introduces the Doctor Who theme. Segun became the composer for the show in 2018. We learn how he was inspired by the original work of Delia Derbyshire & Ron Grainer.
LESSON 2 - Ron’s theme – live!
- Warm up
Sitting or standing in a circle, teach the class this rhythm:

This is the pounding bass line of the original theme
Remind your class that Ron Grainer wrote this theme and then asked Delia to ‘realise’ or ‘arrange’ it electronically. Their task is to realise (play) it live using whatever sounds they can find in the classroom, not necessarily conventional sounds from musical instruments.
Perform the rhythm above again and ask your children to suggest two contrasting sounds to play it. They could, for example use two drums, and on a xylophone it could look like this:

…but can they instead choose two unconventional sounds to perform it? Ask them to look at the everyday objects in the classroom for inspiration. Maybe they could tap a pencil on the seat of a chair and then the legs of the chair for example.
- When this is achieved (you can have as many versions and players as you wish), teach the melody. Here it is written down, but your children can probably all sing it straight away without having to study it!
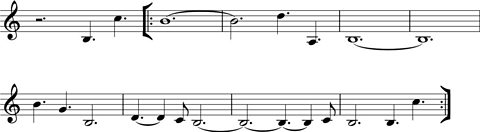
Begin by singing it with a swooping ‘ooo’ sound.
Try singing it along with the bass line. You could divide the class in two to do this.
Again, challenge your class to find everyday sounds in the classroom to replicate it. This is a much harder task! They might have to find different sounds for each pitch and create the rough shape of the tune rather than try to match it exactly.
You could split the class into small groups at this point and challenge them to find sounds for both elements to make their own versions of the tune or you could keep everyone working together. You can include some ‘real’ instruments too if the children run out of ideas.
- FINALLY, create a class version of the theme by putting the bass line and the melody together. If you are working in small groups, bring the class back together at this point.
Lesson 3 - 'Found Sounds'
- Warm-up
Begin with a quick play, or sing through your class version of the Doctor Who theme. If time is short, do this just using body percussion and voice.
Explain to your children that Delia Derbyshire also ‘found sounds’ for her version of the theme. She chose objects rather than traditional instruments and instead of playing them live she recorded them and manipulated the recordings.
If you haven’t yet listened to Delia’s original version of the theme, do so now. It is widely available online. Afterwards explain that the melody was made from one electronic note and the rhythm from one plucked string.
Split your class into pairs and ask each pair to find and record some interesting sounds – just the sounds of everyday objects they find around the classroom or school. Challenge each pair to record as many sounds as they like but then select their favourite three and name them. Ideally they should aim for a short sound, a long sound and something else.
Your children can do this using whatever recording equipment you have available. It can be done on a smart phone or tablet very easily. Split the children into as many groups as you have equipment for or keep the class together and take turns.
- FINALLY, bring the class back together. Hear and discuss the sounds you have found and write their names down on the board. Check that each group or pair have different sounds from each other and that they are as contrasting as possible.
Between lessons, upload these sounds to the desktop of the computers you are going to use next lesson or teach the children to do this for themselves. It will help enormously if the files are clearly labelled with their names and ready for use.
LESSON 4 - Manipulation and special effects
For this lesson you need music editing software such as Audacity (available as a free download). If you don’t have access to Audacity please adapt this plan to suit the software and resources you have. Ideally the children should work in pairs or small groups but if you only have one computer or white board, simply lead the tasks for the full class and ask for volunteers to help.
Remind your children of the work they did last lesson and their ‘found sounds’. Split back into groups trying to ensure that each group has access to a computer.
Open Audacity and show your children how to upload their sounds:
- Click: file
- Click: Import – Audio
- Choose the file
- Editing
When each group has uploaded their three sounds, show them how to edit them and take out any unnecessary silence at the beginning or end:
- Click and drag over the bit you DON’T want – this will be highlighted
- Click: Scissors icon at the top
If at any time a mistake is made, UNDO is:
- Click: edit
- Click: undo
To listen to one sound at a time, rather than all three:
- Click: solo (on the right-hand box at the start of the sound file, underneath its name)
- When all three sounds are edited and your children are beginning to understand the software ask them to start manipulating their sounds. Show them these simple steps:
- Click: solo on the sound they want to manipulate (the other sounds will go grey)
- Highlight the sound file by clicking and dragging over it (it will go white)
- Click: effect
- Choose an effect from the list.
- Move the sliders or change the numbers in boxes
- Click: apply
- Listen by clicking the play icon
Some of the effects work better than others. For each change, the shape of the soundwave changes too. Don’t worry if this feels a bit experimental – Delia often didn’t know what sounds she would end up with when she experimented!
Challenge each group to manipulate their sounds until they have three new contrasting sounds. Again they should still aim for one short sound, one long sound and something else.
FINALLY, as a full class listen back to some of these new sounds and see if the listeners can guess which object they started out as. Make sure all of these files are safely saved for next time.
LESSON 5 - Looping and pitching
Begin in groups again with the Audacity files open from last time.
Show your children how to ‘loop’ a sound to create a rhythm (i.e. repeat it over and over):
- Select the sound to manipulate but clicking solo and highlighting
- Click: effect
- Click: repeat
- Enter a number in the box
- Click: ok
Listen to your loop by clicking on the play icon.
Your sound will now repeat. You have made an ostinato from a found sound just like Delia’s bass line.
- Show your children how to make a ‘melody’:
- Select the sound to manipulate by clicking solo and highlighting (it helps if this one is short and already has a pitch)
- Click: effect
- Click: change pitch
- Move the slider
- Click: apply
If you copy this sound (highlight, click edit: copy, click somewhere else, click edit: paste), and repeat these steps you can make a chain of ‘notes’ – i.e. a melody.
- Show your class how to add in some classic electronic sounds similar to those Delia worked with:
- Click where you want the sound to go (anywhere on one of the tracks)
- Click: Generate
- Click: Chirp
- Click: ok
A very 1960s sounding ‘chirp’ is added to your music where you clicked. This can also be manipulated. There are other sounds under the ‘generate’ menu that are fun additions.
- Finally, allow your children to continue experimenting and composing in this way for the rest of the session.
LESSON 6 - Structure and finish
Again, begin in groups at the computers.
Challenge your class to structure their ideas into a finished piece. To do this they must move their ideas around thinking carefully about the order of events and how to layer up their ideas. The easiest way to do this is as follows:
- Highlight section you want to move
- Click: copy
- Click where you want it to go
- Click: paste
Ask each group to imagine that their finished piece is the theme tune to a TV show. They must invent the title of the show and a sentence describing what it is about.
FINALLY, share! Each group must announce the title of their imaginary TV show and explain what it is about before playing their finished piece to the rest of the class.
TAKING IT FURTHER - Cross-curricular activities
SOUND EFFECTS: The ±´”„tv Radiophonic workshop existed to make sound effects for TV and radio. Have a go at making your own sound effects and add them into a play or story.
LITERACY: write the first episode of your invented TV show. Do this as a play script, stage it and add sound effects!
RESEARCH: discover more about the ±´”„tv Radiophonic Workshop and its pioneers.
UPLOAD: Show us what you’ve created! Submit your creative responses using our Uploader for a chance to be featured on the Ten Pieces website.
Upload and showcase your creative responses
Upload your creative responses to the Ten Pieces repertoire for your chance to feature in the Ten Pieces creative showcase.