Halloween cheesecake
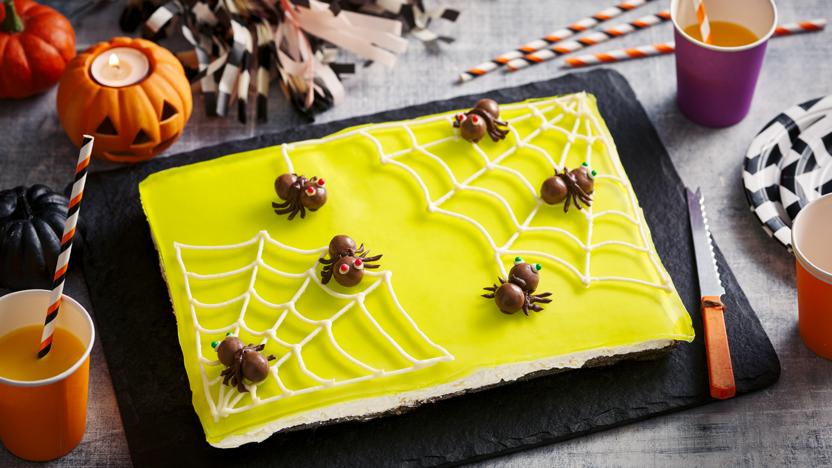
The eerie green glow of this Halloween cheesecake will bring a touch of magic to your kids’ Halloween party.
Ingredients
- 300g/10½oz chocolate sandwich biscuits, such as Oreos or bourbon biscuits
- 100g/3½oz unsalted butter, melted
- 3 x 280g packs full-fat cream cheese
- 125��/4½�dz� icing sugar
- 1 tbsp vanilla bean paste
- 300ml/½ pint double cream
- 135g pack green lime jelly
- 50��/1¾�dz� white chocolate, chopped into small pieces
- 12 chocolate malted milk balls, such as Maltesers
- red and green sugar balls (large hundreds and thousands/sprinkles)
- 2–3 tsp cocoa powder
Method
Line the base and sides of a 20 x 30cm/8 x 12in baking tray (at least 5cm/2in deep) with cling film. Put the biscuits in a food processor and blend to crumbs. Add the melted butter and blend until combined. Using the back of a spoon, press the damp crumbs into the lined baking tray to make a flat base. Place in the fridge while you make the cheese mixture.
In a large bowl, whip the cream cheese, icing sugar and vanilla bean paste: this may seem a little runny at first, but after a few minutes it will thicken enough to hold its shape. In another bowl, whisk the cream to soft peaks, then fold into the cream cheese mixture. Set aside 50��/1¾�dz� of this mixture in the fridge. Spoon the rest onto the biscuit base, spread evenly and level the surface (a small offset spatula works well for this). Place in the fridge for a couple of hours to firm up.
Make up the jelly according to the packet instructions, then leave to cool in the jug for 30 minutes. Place the prepared cheesecake on a shelf in the fridge that you can easily reach, then carefully pour the jelly over the cream cheese layer. Leave to set for at least 2 hours.
Remove the reserved cheesecake mixture from the fridge, to come to room temperature.
Melt the white chocolate in short bursts in the microwave, or in a small bowl set over a small pan of gently simmering water (do not let the bowl touch the water). Once melted, leave to cool for about 5 minutes, then stir in the reserved cheesecake mixture. Spoon into a piping bag fitted with a small (2mm) round nozzle, or spoon into a disposable sandwich bag and cut off a tiny bit of the corner.
Remove the cheesecake from the tin (unless serving in the tin), place on a serving plate or board and tidy up any rough edges, if you like. Pipe a cobweb design onto the jelly, then position pairs of malted balls here and there to create spiders’ bodies. Pipe some of the white mixture onto the spiders to make eyes, and finish with red or green sugar balls. Mix the remaining white mixture with the cocoa and return to the cleaned piping bag; pipe on the spiders’ legs. If you’re not serving straight away, return the cake to the fridge until ready to serve.
Recipe Tips
If you don't want to use cling film you could leave the tin unlined and serve straight from the tin.
Summer
Recipes
Related Recipes