Funfetti cake
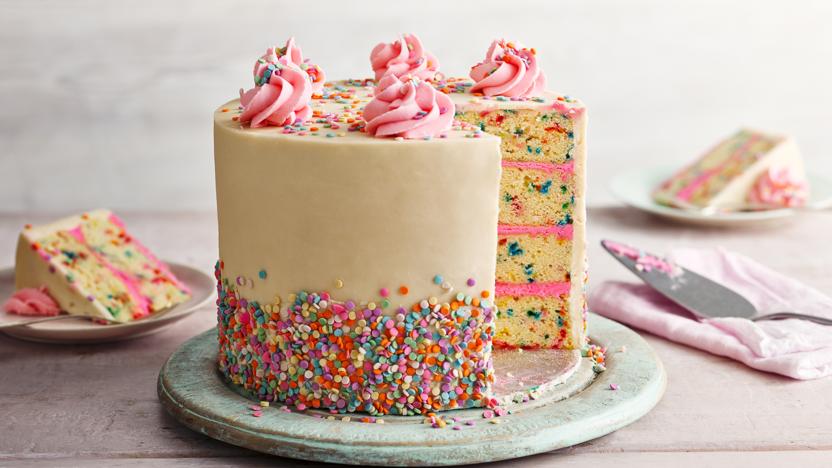
Funfetti cake is a birthday cake that’s sure to impress. This recipe is fairly straight-forward to make too – you could even whip it up with the help of your kids using our step-by-step pictures and instructions for how to make a funfetti cake and other fun party cakes.
For this recipe you will need 4 x 20cm/8in sandwich cake tins (approximately 4cm/1.5in deep), a 20cm/8in and a 30cm/12in cake board, two non-slip cake mats trimmed to about 18cm/7in and 25cm/10in diameter, a turntable, a cake side scraper and a medium piping bag with a large star-shaped nozzle.
Ingredients
For the sponge
- 400g/14oz salted butter, at room temperature, plus extra for greasing the tins
- 400g/140z caster sugar
- 8 large free-range eggs, lightly beaten
- 3 tbsp vanilla extract
- 400g/14oz self-raising flour, plus extra for dusting the tins
- 90g/3¼oz multi-coloured sprinkles (go for very intensely coloured sprinkles if you can)
For the buttercream
- 500g/1lb 2oz salted butter, at room temperature
- 1kg/2lb 4oz icing sugar
- 3 tbsp vanilla extract
- 2 dashes milk, optional
To decorate
- 120g/4½oz of pastel sprinkles
- 2 dashes pink food colouring
Method
Preheat the oven to 170C/150C Fan/Gas 3. Grease 4 x 20cm/8in sandwich cake tins and line the bottoms with greaseproof paper. Dust the tins with flour, then shake out the excess.
To make the sponges, beat the butter and sugar together in a stand mixer or with a handheld electric whisk on a high speed until pale and fluffy. Turn the mixer to low speed and add the eggs bit by bit, mixing on high speed after each addition. Add the vanilla, then add half of the flour mixture. Mix until combined, then add the rest of the flour and mix until you have a smooth cake batter. Add the brightly-coloured sprinkles and fold them through with a spatula.
Divide the cake batter between the 4 cake tins, filling each tin up to three-quarters full. Bake for 30-35 minutes, turning after 20 minutes so they colour evenly. Once baked, cool the cakes on a wire rack. (Chilling the cakes or even freezing them will make them sturdier to work with.)
To make the buttercream, place the salted butter in the bowl of an electric mixer. Sift the icing sugar on top, bring the mixture together at a low speed, then beat at high speed for a few minutes until the mixture is pale and fluffy. Add the vanilla extract and beat to combine.
Put half of the buttercream in a separate bowl and add a dash of pink food colouring to it. Mix and add more colour if necessary, until the desired shade is achieved. The rest of the buttercream can be set aside at room temperature until later.
Remove the cakes from the fridge and trim the domes off so they are flat. Discard (or eat) the off-cuts. Place the 18cm/7in non-slip mat on the turntable and put the 20cm/8in cake board on top. Put a dab of pink buttercream on the cake board and place one of the sponges on top. Spread a 1cm/½in thick layer of buttercream on the top of the sponge. Place the next sponge on top and repeat this process until you have assembled the 4 sponges on top of one another with 3 layers of buttercream in between. The final top sponge should have the base facing upward. Gently press the top of the stack to ensure the cake is level and free of air bubbles. Place in the fridge for 10 minutes.
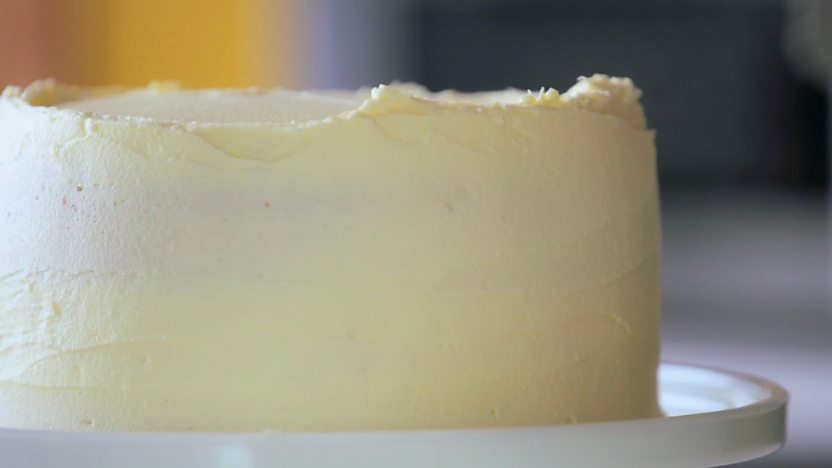
Using a knife or a cheese grater, trim the sides of the cake to within a few millimetres of the cake board it’s sitting on. Add a splash of milk to the plain-coloured buttercream and beat again for about 30 seconds. Put 2 spoons of the buttercream on top of the cake, then spread the buttercream towards the edges and down the sides with a palette knife. Scrape off any excess and discard. This crumb coat layer should be very thin, almost translucent in parts. Return the cake to the fridge for 10 minutes.
Put the 25cm/10in non-slip mat on the turntable and place the 30cm/12in cake board on top, along with the cake. Place all but 3 tablespoons of the buttercream on top of the cake. Gently rock the palette knife back and forth to disperse the buttercream and turn the turntable in the opposite direction to that which you are spreading. Spread the buttercream evenly over the top and down the sides of the cake. Scrape the excess buttercream off the sides of the cake using the side scraper. Turn the turntable in a fluid motion while ensuring you keep the blade at a 45 degree angle against the side of the cake with your other hand. Repeat until you have a nice smooth finish.
Using your palette knife, carefully brush any excess buttercream that’s gathered at the rim of the cake towards the centre, aiming all the time for sharp edges, straight sides and a flat top. If the buttercream has ‘torn’ in places, dip your palette knife in hot water and use that to smooth over any imperfections. Put the cake back in the fridge for 10 minutes, or until you’re ready for the next stage.
Put the cake directly on the turntable. Apply the remaining 3 tablespoons of plain-coloured buttercream to the lower third of the cake in a rough pattern, then press the pastel sprinkles into the buttercream. It helps to have a bowl underneath to catch the falling sprinkles!
Beat the rest of the pink buttercream and place it into the piping bag fitted with the star nozzle. Pipe six swirls on top of the cake and sprinkle them with the remaining sprinkles.
Recipe Tips
You can easily halve the recipe and make two layers for a smaller cake.
A turntable makes it easier to get that smooth finish on the outside, but you can make this cake without. Very bright multi-coloured sprinkles are available online or from large supermarkets.
How-to videos
Summer
Recipes
Related Recipes