Dinosaur volcano cake
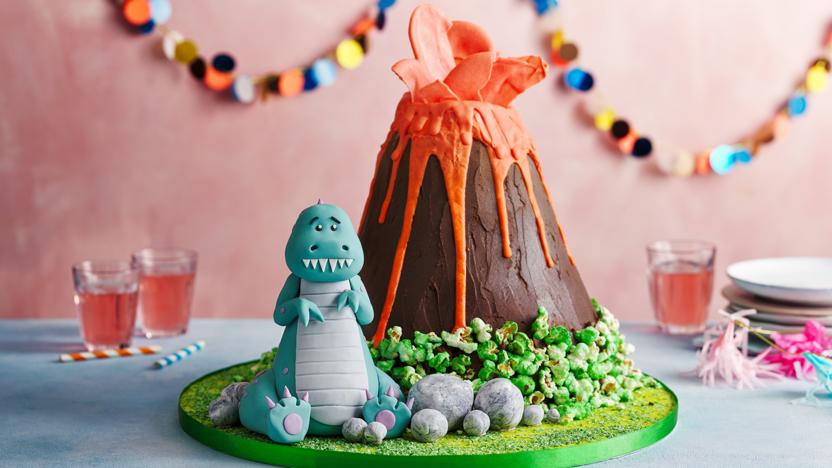
This dinosaur-themed children’s birthday cake is perfect for your next celebration. A sumptuous red velvet cake hides underneath the chocolate volcano, and the coconut grass, edible rocks, chocolate lava and fondant dinosaur make this a real showstopper. Get step by step instructions and pictures for how to make this dinosaur cake and other fun party cakes.
For this recipe you will need 4 x 20cm/8in sandwich cake tins (approximately 4cm/1¬Ωin deep), a 25cm/10in and a 40cm/16in cake board or large serving platter and a couple of wooden skewers.
Ingredients
For the red velvet cakes
- 270g/9¬Ωoz salted butter, softened
- 670g/1lb 4¬Ωoz caster sugar
- 5 large free-range eggs, lightly beaten
- 2 tsp vanilla extract
- 1¬Ω tbsp red food colouring paste
- 670g/1lb 4¬Ωoz plain flour
- 45≤µ/1¬Ω¥«≥˙ cocoa powder
- 530ml/1 pint buttermilk
- 2 tsp bicarbonate of soda
- 7 tsp white wine vinegar
For the vanilla buttercream
- 250g/9oz salted butter, at room temperature
- 500g/1lb 2oz icing sugar
- 1¬Ω tbsp vanilla extract
For the chocolate buttercream
- 300≤µ/10¬Ω¥«≥˙ dark chocolate, broken into pieces
- 300ml/10fl oz double cream
- 200g/7oz salted butter, at room temperature
- 400g/14oz icing sugar
- 1 tbsp vanilla extract
For the chocolate lava
- 350g/12oz white chocolate, broken into pieces
- 12≤µ/¬Ω¥«≥˙ sunflower oil
- dash orange food colouring paste
To decorate
- dashes black, green, blue, purple food colouring
- 200g/7oz desiccated coconut
- 100≤µ/3¬Ω¥«≥˙ caster sugar
- 2 tbsp of water
- 40g/1¬Ωoz pre-popped popcorn, sweet or salted
- 1kg/2lbs 4oz fondant icing
- icing sugar, for dusting
Method
Preheat the oven to 170C/150C Fan/Gas 3. Grease 4 x 20cm/8in sandwich cake tins and line the bottoms with baking paper. Dust the tins with flour, then shake out the excess.
To make the sponges, beat the butter and sugar together in a stand mixer or with a handheld electric whisk on a high speed until pale and fluffy. Add the eggs bit by bit, mixing thoroughly on high speed after each addition, then mix in the vanilla and red food colouring. Turn the mixer down to low speed and add the cocoa powder and half of the flour. When that is well mixed, beat in half of the buttermilk. Repeat with the remaining flour and buttermilk until the mixture is smooth and uniform.
Combine the bicarbonate of soda and vinegar in a small bowl and as soon as it starts to fizz, pour into your red cake mixture. Beat the mixture for another 2 minutes on high speed.
Divide the cake batter between the 4 cake tins, filling each tin up to three quarters full. Bake for approximately 35 minutes, turning after 20 minutes so they colour evenly. Once baked, cool the cakes on a wire rack, then wrap in cling film and store in the fridge.
To make the vanilla buttercream, beat the salted butter and icing sugar together at high speed for a few minutes until the mixture is pale and fluffy. Add the vanilla extract and beat to combine.
Remove the sponges from the fridge and trim the domes off. Keep the off cuts. Take 3 of the sponges and cut out a 18cm/7in, 15cm/6in and 12cm/5in circle from each. Keep the leftover rings.
Set 150g/5½oz of the buttercream aside to use later. Spread a thin layer of the remaining buttercream on the 25cm/10in cake board and use 2 of the cake rings (not the circles) to create a circular bottom layer that is the same diameter as the cake board. Fill the hole in the centre and any gaps around the outside with the reserved off cuts. Spread a 1cm/½in layer of buttercream on top of this layer, then lay the 20cm/8in sponge on this. Repeat this process using smaller diameter sponges each time. Spread a layer of buttercream on the top sponge, then create an opening to the ‘volcano’ with the remaining sponge rings. Pack any leftover sponge into the ‘steps’ of the volcano to give it a more organic look. Place in the fridge.
To make the chocolate buttercream, put the chocolate into a heatproof bowl. Bring the cream to the boil over a medium heat, stirring regularly, then pour over the chocolate and let it stand for a couple of minutes. Stir the ganache briskly to bring it together. If some of the chocolate hasn’t melted, you can heat it for 10 seconds at a time in the microwave.
Beat the butter and icing sugar together at high speed for a few minutes until the mixture is pale and fluffy. Add the vanilla extract, then pour the chocolate ganache into the buttercream and beat until combined.
Set aside 150g/5¬Ωoz of chocolate buttercream coating for use later. Spread the remaining chocolate buttercream generously over the cake until you have a cone shape. Return the cake to the fridge to firm up.
To decorate, line 2 oven trays with baking paper. Thin out a dash of green food colour paste with a few tablespoons of water in a little bowl. Add this to a sandwich bag along with the desiccated coconut, then seal it and scrunch the coconut around until it’s all coloured. Spread the coconut on one of the trays to dry out.
Dissolve the sugar in 2 tablespoons water in a medium saucepan and reduce to a syrup over a medium heat. Add a few dashes of green food colouring, then add the popcorn and toss to coat. Spread the popcorn on the other tray to cool.
Stir a few dashes of green food colouring into the 150g/5¬Ωoz vanilla buttercream you set aside earlier. Spread a thin layer onto the 40cm/16in cake board or platter. Sprinkle this with the coloured coconut. Spread a thin layer of the remaining chocolate buttercream around the bottom third of the cake and press the popcorn into it. Remove the cake from the fridge and place the cake carefully on the cake board, sprinkling any remaining popcorn around the base of the cake.
To make the chocolate lava, mix the sunflower oil and orange food colouring in a bowl. Melt the white chocolate in 10 second intervals in the microwave. Stir the chocolate briskly into the oil mixture. Check how runny the ‘lava’ is by dripping it against the side of the bowl – if it needs to be more runny, add a little more oil.
Coat the top of the cake with lava, then drip half of the mixture down the sides in a similar style to the picture. Spread the remaining mixture on a greaseproof paper-lined tray and place in the freezer for 5 minutes. When the lava has set, break into shards and stick to the top of the volcano.
To make the dinosaur, colour 900g/2lbs of the fondant icing with food colouring until you have your desired shade. We used a combination of green and blue for the image. Roll 600g/1lb 5oz of this into a vase shape for the body. Push a wooden skewer into the entire body from the top down, then trim the stick to 3cm/1in past the cut off point of the neck. Sit the body on a surface dusted with icing sugar. Shape 2 legs using 75g/2¬Ωoz each of the same coloured fondant. Pinch the end of each leg and shape the feet. Attach the legs to the main body using a tiny bit of water. Use a skewer to indent the toes and make holes for the claws. Colour a walnut-sized chunk of fondant using whatever colour you want the chest to be. Roll the fondant out to a thin sheet, then cut into an oval shape and stick onto the body using a tiny amount of water. Score horizontal lines in the chest with a knife or skewer. Take three more large walnut-sized pieces of coloured fondant and roll into long sausages. Shape 2 of these sausages into arms, and pinch at the end to fashion the claws. Use a tiny dab of water to stick the arms into place. Shape the third piece of fondant into a tail and attach to the back of the dinosaur in the same way.
Make the remaining coloured fondant into a wide pear shape for the head. Use a wooden skewer and a knife to indent a mouth, nostrils and eyes. Using some of the white fondant, cut out triangles for the teeth and stick to the mouth with a dab of water. Attach the head using the wooden skewer that’s sticking out from the main body. Colour another walnut-sized piece of fondant with whatever shade you would like the spots and spikes to be. Shape these with your hands and apply with a dab of water. Finally, colour a tiny bit of fondant black, and stick on the eyes and eyebrows. Adding a dab of white on top of the black really makes them come alive. Place the dinosaur in situ on the cake board. If you have any white fondant remaining, marble a little black colouring through it and roll between your palms to make rocks. Finish by placing them around the dinosaur.
Add the dinosaur to the cake and serve to a very excited audience!
Recipe Tips
You’ll want to set aside plenty of time to make this artsy showstopper, especially if you’re planning on shaping your own fondant dinosaur to go with it! But you can spread out the effort and make and freeze the cakes on one day, make the dinosaur on another and assemble at the end.
Student
Recipes
Related Recipes